PrismWPFSample(5)アプリの設定
Prismを使用したWPFアプリケーション開発で役に立つと思われる項目を一つのアプリケーションにまとめたものを作りました。今回は、アプリの設定方法について書いています。
動作環境:Win10, Visual Studio Community 2017, Prism V7.1.0.431, .NET4.5.2, Prism Template Pack, TraceListeners, WPFLocalizeExtension, OxyPlot
- CModel の settingInfo プロパティ設定
- DataGrid へ表示用の ObservableCollection
- DataGrid にソートして表示
- DataGrid で書き換えた内容の保存
- 設定の初期化
- おまけ DataGrid の見栄えの変更
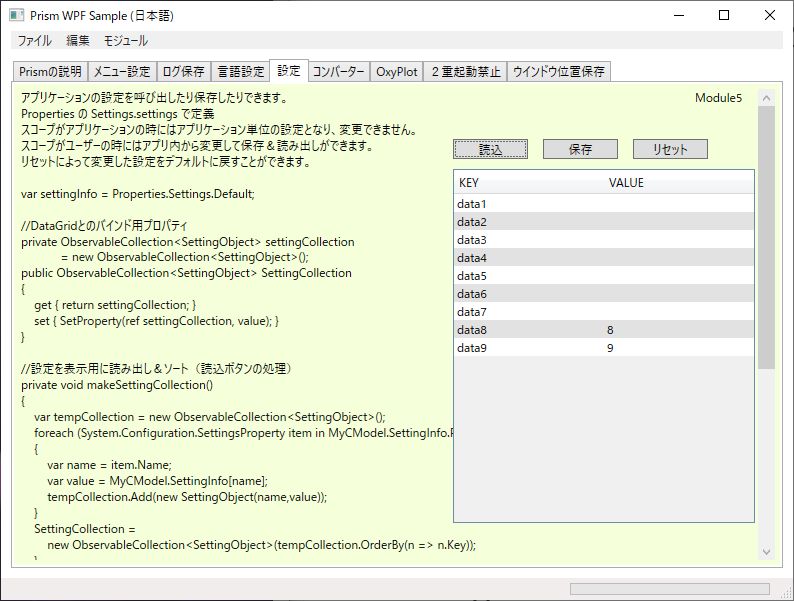
アプリの外観はこんな感じです。

アプリケーションの設定は、VisualStudioに用意されている Properties の Settings.settings を使用して保存と読み出しができます。
これもモジュールで共有できるように CommonModels に作っておきます。

アクセス修飾子は Public にします。
スコープがアプリケーションの時にはアプリケーション単位の設定となり、ユーザー単位での変更はできません。
スコープがユーザーの時にはアプリ内から変更して保存&読み出しができます。
リセットによって変更した設定をデフォルトに戻すこともできます。
CModel の settingInfo プロパティ設定
設定へのアクセスは次のように Properties.Settings.Default でアクセスする事ができます。
CommonModels の CModel に次のようなプロパティーを作っておいて使います。
private Properties.Settings settingInfo = Properties.Settings.Default;
/// <summary>
/// 共通でこのPropertiesを使用する
/// Properties.Settings.settingsのアクセス修飾子をPublicにしておくこと
/// </summary>
public Properties.Settings SettingInfo
{
    get { return settingInfo; }
    set { SetProperty(ref settingInfo, value); }
}
DataGrid へ表示用の ObservableCollection
DataGrid に表示するためには、次のように ObservableCollection のプロパティを設定して置いてバインドします。
//DataGridとのバインド用プロパティ
private ObservableCollection<SettingObject> settingCollection
            = new ObservableCollection<SettingObject>();
public ObservableCollection<SettingObject> SettingCollection
{
    get { return settingCollection; }
    set { SetProperty(ref settingCollection, value); }
}
DataGrid にソートして表示
SettingCollection への読込は下記のようなメソッドをコマンドボタンから呼ぶようにしています。
DataGridに表示された後でソートできますが、表示された初めからソートされているように OrderBy で並べ替えておきます。
//設定を表示用に読み出し&ソート(読込ボタンの処理)
private void makeSettingCollection()
{
    var tempCollection = new ObservableCollection<SettingObject>();
    foreach (System.Configuration.SettingsProperty item
            in MyCModel.SettingInfo.Properties)
    {
        var name = item.Name;
        var value = MyCModel.SettingInfo[name];
        tempCollection.Add(new SettingObject(name,value));
    }
    SettingCollection =
        new ObservableCollection<SettingObject>
            (tempCollection.OrderBy(n => n.Key));
}
DataGrid で書き換えた内容の保存
保存ボタンでの処理は、SettingCollection の内容を MyCModel.SettingInfo に書いておいて Save します。
Save した内容が、次回アプリを起動した時に読み出されます。
//修正値の保存(保存ボタンの処理)
private void saveSettingCollection()
{
    foreach(SettingObject item in SettingCollection)
    {
        string key = item.Key;
        object value = item.Value;
        MyCModel.SettingInfo[key] = value;
    }
    MyCModel.SettingInfo.Save();
}
設定の初期化
Reset で内容を初期状態(VisualStudio の Settings.settings に表示されている値)に戻す事ができます。
private void resetSettingCollection()
{
    MyCModel.SettingInfo.Reset();
    makeSettingCollection();
}
おまけ DataGrid の見栄えの変更
ここで設定しているDataGridの説明を付け加えておきます。
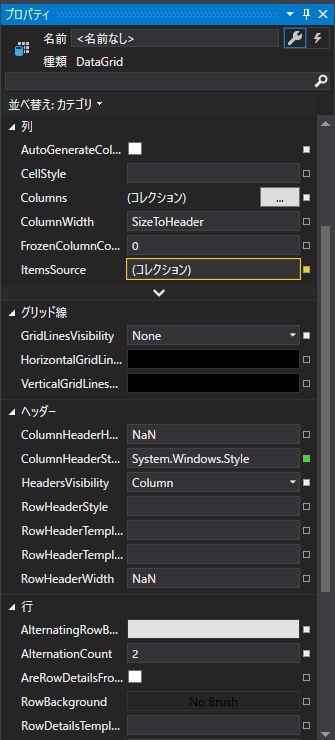
まず、列の自動生成を解除します。
AutoGenerateColumns のチェックを外す
GridLinesVisibility をNone にします。
HeadersVisibility をColumn にして Row(左側に表示されているヘッダー)を非表示にします。
AlternatingRowBackground をクリックして色を少し暗く変えます
AlternationCount を2にして1行ごとに上記の色が適用されるようにします。

表示したいコラムを追加します。
追加するためには DataGrid を右クリックして 列の追加から DataGridTextColumn を追加します。

もしくは DataGrid のプロパティーの Columns(コレクション)をクリックしてダイアログから追加します。
DataGridColumn コレクションエディター:Columns の追加のドロップダウンに DataGridTextColumn が無い時にはその他から選択して追加します。

追加された DataGridTextColumn のプロパティーで Header (コラムのヘッダーに表示される文字)を設定し、表示したいデータとバインドします。
データの内容を書き換えられなくするためには、IsReadOnly にチェックを入れます。

追加されているコラムを右クリックして「列のスタイル編集」から」「HeaderStyleの編集」「コピーして編集」を選択します。
スタイルの名前は適当につけておきます。ヘッダーを中央に表示したいので「DataGridColumnHeaderCenter」と言う名前にしておきます。

DataGridColumnHeaderCenterのプロパティーが開くので、ContentPresenter を Grid で囲い、ContentPresenter の HorizontalAlignment を Center にします。
SeparatorVisibility も Hidden に変えておきます。
これで Designer 上の Header の文字がセンターに表示されるようになります。
このまま実行してみると、まだ Header が左詰めで表示されていると思います。
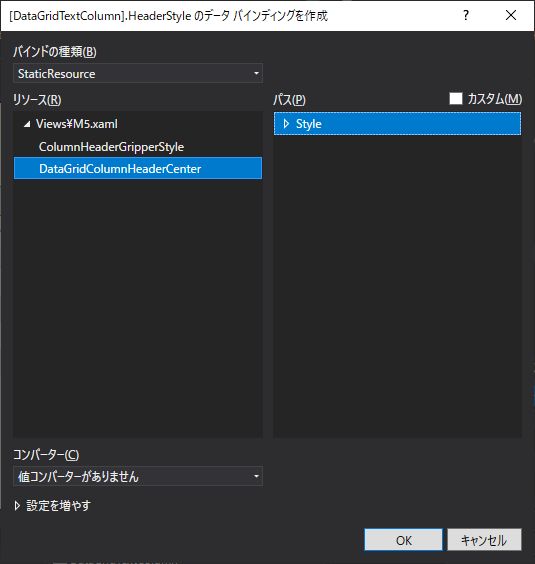
DataGridTextColumn の HeaderStyle を StaticResource の DataGridColumnHeaderCenter の Style にバインドします。

これで実行時もHeaderがセンターに表示されるようになります。
次にセルの表示を右詰めにするために、TextBlockStyleRight と言う名前で ElementStyle を作ります。
プロパティーのTextAlignment で「Right」を選択します。
これも同じで、適用したいコラムの ElementStyle で TextBlockStyleRight をバインドします。
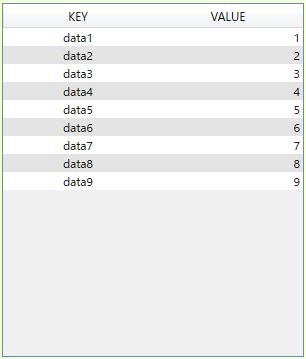
センター表示も作って適用すると下記の様になります。

次回は、6. コンバーター について記述したいと思います。